Best Places to Photograph in Yosemite Valley

Located in California Yosemite Nation Park is one of the most popular and iconic national park in USA. It attracts millions of visitors annually and there is an abundance of very easily accessible spots to capture the beauty of this park. Since I visited Yosemite in March, Wawona, Glacier Point Road and Tioga Road were closed. So this blog is all about Yosemite Valley. 

Bridalveil Falls

If you drive into the valley, this is the first waterfall you will see. Getting there is very easy- it’s a short 0.5 mile round trip walk from the parking lot which takes you to the base of the waterfall. I suggest visiting this fall about 30-60 mins before sunset as the rocks turn golden yellow during this time. This is a beautiful 620 feet drop waterfall down the south wall of the Yosemite Valley. Don’t forget to take your wide-angle lens to capture the entire waterfall from the base. Since when I visited the park  during off season, there were not very many visitors and I had the luxury to take a long exposure shot from the base.

Photo from the base of the waterfall
Photo from the road

Gates of the Valley or Valley View

Drive west for about 4.3 miles from the Yosemite lodge and you will find a large turnout on the left, on the bank of the Merced River. Valley View is easy to miss if you are not paying attention. Here the view is like a classic Ansel Adams photo view. It’s like Tunnel View only it’s down on ground level right up next to the river.

I visited here during late afternoon, just before the golden hour. This is one of my favorite spots in the valley. You can see Bridalveil falls on the right and El Capitan and Cathedral rock on the left all in one frame. I suggest using a wide angle lens (I used a 16-35 mm lens) and to shoot from a low angle so that you can have the river/logs in the foreground. Ideally, it is useful to carry a graduated ND filter as the rocks are brighter than the foreground. But I could easily correct this in post production. Just remember to shoot for the highlights.

El Capitan

When you drive into Yosemite Valley you cannot miss the imposing chunk of granite- El Capitan on the left. There are plenty of pull-outs on both sides of the road to stop and take photos. It is best to photograph during a clearing storm when nature produces amazing light and dramatic clouds above the cliffs.I took this photo right at the cusp of the golden hour and blue hour and soft pinkish light on the granite roack was outright gorgeous.

Tunnel View

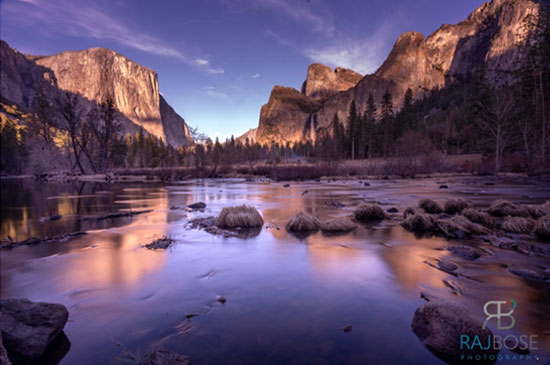
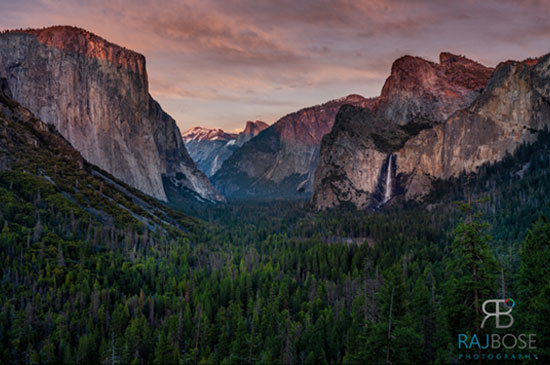
This is probably the most iconic spot, made famous by Ansel Adams, in Yosemite and is a must stop in Yosemite. If you are interested about Ansels photo from this location please check out Ansel’s masterpiece “Clearing Winter Storm”. To reach this place, follow signs for Highway 41 to Fresno and pull to the parking lot on the right just before the tunnel. I suggest going there for sunrise or sunset. But since this is an extremely popular spot try to go there early. There are always a line of photographers by the ledge with the best view who already set-up their tripods and cameras.

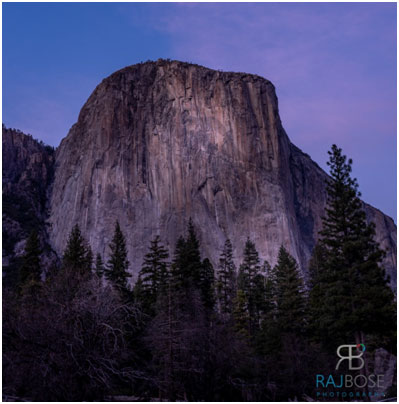
The Tunnel View for me is probably the most beautiful view of the park. If you use a wide angle lens, in one frame you can capture the valley floor on the foreground, imposing El Capitan in the left and the beautiful Bridalveil falls on the right. Wait for some interesting cloud formation as that will really make the shot so much interesting.

Swinging Bridge

There is a dedicated parking lot for this just like some of the other spots. The name is a misnomer though. The bridge over the Merced River does not swing but the view of the Yosemite falls is gorgeous.  When I went there in the afternoon, it wasn’t too crowded and the walk from the car was literally just 2 minutes. There could be many compositions – one with a wide angle with the tree on the bank of the Merced river providing a natural foreground like in the photo here. The other composition could be zooming in more to isolate and filling the fame with only the waterfalls.

Lower Yosemite Falls

This waterfalls is easily accessible- just get down at bus stop 6 and continue walking to the base of the waterfalls. It rained a lot the day before I went there so there was plenty of water in the falls. The walk is short, easy and rewarding. The trail is paved, and you can stop at any point to take pictures. At the end there is a bridge viewing area. To take some good shots, get off from the bridge on to the rocks in the front to get a lower angle and better foreground. But please take utmost care as the rocks could be slippery and dangerous. From the bridge the trail continues and one can go up on the left side of the river right to the base of the falls to get a better view of the upper falls.

I used a polarizing filter and ND 6 filter to soften the harsh light and take long exposure shot. Best time to go there is early morning or late afternoon.

View from the base of the Lower Yosemite Water Fall

Vernal Falls

This is probably the most enjoyable hike in Yosemite. You can take the bus to Happy Isles stop number 16. Get off from the bus, cross the bridge and start walking along the trail to the right. It takes bout 3 to 4 hours round trip depending on your fitness level and speed. This is a substantial hike  and is not meant for unfit people. But the hike is very rewarding as it is full of beautiful scenery and substantial elevation. After about 0.8 miles on the Mist Trail you will reach a bridge and the first sight of the falls. You can continue another 0.2 miles where the Mist trails  and John Muir Trail splits. Take a left and keep going for another 0.5 miles up the 600 granite which could be very slippery. You can reach the top of the waterfall right up to the edge, and can experience the jaw-dropping 317 feet. drop. Please be very careful and be prepared to be drenched and last but the not the least, take utmost care of your camera gear.a

Mirror Lake

Best way to reach here is by shuttle bus and get off at stop number 17. It’s a very pleasant 2-mile roundtrip walk on a paved road from the bus stop. Here you can get a beautiful reflection of Mt. Watkins. Although located just under half dome, it is difficult to capture the entire dome from here. In the photo below, I took multiple images in portrait mode and then stitched them in Lightroom.

Tuolumne Grove

This is located on the Tioga Road (the road was closed beyond this point) and not in Yosemite Valley. There is a parking lot here albeit it’s limited. In this grove there are about a dozen giant sequoias but they are not visible from the parking lot. To see these giant trees, you have to hike about a mile, all downhill, with an elevation loss of 500 ft. Take plenty of water with you (no water is available in the trail) as coming back to the parking lot can be quite strenuous.

2 thoughts on “Best Places to Photograph in Yosemite Valley”

    1. Hi Denny,

      Thanks so much for the comment. Its hard to take bad photos in Yosemite :). The coffee table book is coming along well. Hope you guys are safe.

      Cheers,

      Raj

Leave a Reply to Denny Zantout Cancel Reply

Your email address will not be published. Required fields are marked *